Techniques

Sidereal Time and Psychic Phenomena

From the article: Apparent Association Between Effect Size In Free Response Anomalous Cognition Experiments And Local Sidereal Time, by S. James P. Spottiswoode, Cognitive Sciences Laboratory, Palo Alto, CA 94301. Published in The…

The Monroe Way

Binaural synchronization induced meditative state Previously published in the Spring 2008 AA-EVP NewsJournal Robert Monroe had spontaneous out-of-body experiences, which are well-documented in his books, Journey out of Body (Doubleday,…

Using Live Voice Input Files for EVP

Previously published in the Spring 2012 ATransC NewsJournal Several members in the Idea Exchange have been using recordings of foreign language as background sound for EVP sessions. What we refer…

EVP Using VoIP and Telephones

margaret-telephone-evp

Originally published in the Fall 2012 ATransC NewsJournal Also see: Phone Line EVP and Recording EVP Using a Telephone Recording for EVP using the telephone system has always offered tantalizing…

Recording EVP Using a Telephone

debbie-telephone-evp

Debra Ann’s Telephone Recording EVP Using a Telephone Previously published in the Spring 2007 ATransC NewsJournal Also see: Phone Line EVP and EVP Using VoIP and Telephones Please note that…

Basic EVP Recording Technique

Also see: White Paper on  Transcommunication with emphasis on Electronic Voice Phenomena What is EVP? Electronic Voice Phenomenon (EVP) are intelligible voices found in recording media that have no known…

Selecting an Audio Recorder

Audio recorders models on the market frequently change, and for this reason, we do not recommend particular recorder models. Instead, we will try to provide a list of recommended characteristics…

Simple Optical Microphone

by David Mierzwinski (c) All Rights Reserved Previously published in the Winter 2006 AA-EVP NewsJournal Also see: Experimental Recording Techniques Using a Phototransistor For nearly a year, I have been conducting various…

Experimentation with Inverted Channel Nullification

by Zoë J. Robinson
Originally posted in the Summer 2007 issue of the ATransC NewsJournal

When I agreed to write this report back in January, I was hopeful of being able to include a success story or two regarding EVP. As it turns out, I seem to have followed in the footsteps of so many investigators who have sought to find evidence of EVP but have gone away empty-handed. Nevertheless, I believe the ideas behind Inverted Channel Nullification (or ICN for short) are still worthy of experimentation and it is on this basis that I have written this report.

What is Inverted Channel Nullification?

Put simply, ICN is a method of recording the same sound twice and using one recording to filter noise from the other. A mono microphone is used to input a signal to a stereo sound card in a computer and the two channels on the sound card each produce a copy of the recording. In theory, these copies will be identical, although with the majority of sound cards there will be a minor variance due to slight differences in the components used to build the sound card itself.

These variants are minor, and in the experiments I made, they only show up if you amplify the signal so much you’ve distorted the original recording enough to make it unusable. In essence, the recordings are identical for the purposes of all but the most stringent of investigators.

Why is this useful?

When two recordings are made of exactly the same sounds they should, in theory, contain the exact same data. It should, therefore, be possible to invert one of these recordings, making it the exact opposite sound wave to what it was originally, and then superimpose this first recording over the second recording. If the two sound waves are identical, and they should be, the result will be a perfectly flat sound wave because all data in the recording will disappear.

In EVP investigation, it is sometimes the case that two or more people can record at the same time in the same room and receive different results. Of course, these recordings won’t be made under the exact same circumstances as not only will the positions of the recording devices be different but the input and recording mechanisms used will be different, even if the same model of device is used; as all devices are different.

With ICN the possible variables are reduced significantly: for both recordings, the input device and its location are identical and the recording process is identical also. The only variable is in the components inside the sound card but, as described earlier, these may be as close to identical as possible. In effect, you’re using the same device to make two separate recordings.

This means you should have two copies of the same thing but, as we’ve already mentioned, in EVP recording the same thing twice doesn’t always give you the same results. An EVP can appear on one recording and not the other and with ICN this is no different—the two channels of the sound card are acting as two separate recorders, after all. So there’s an advantage to the ICN process already: you’re doubling your recording sessions with minimal effort.

This isn’t the only potential advantage, however. With two copies of the same recording, you can use one to filter the background noise from the other. EVP investigation is notorious for noisy recordings and with this method you can rid yourself of that, leaving only sounds that appear on one recording but not the other. Of course, you’re still left with the task of listening to the original recordings in case there’s something important that appears on both, since if that’s the case, ICN will remove it!

How to perform Inverted Channel Nullification

To perform ICN yourself, all you will need is a computer with a stereo sound card and a microphone input jack, a standard mono microphone and audio manipulation software to perform the inversion and channel mixing.

Illustration 1: A simple recording showing two identical copies of the same input.

Once you have your equipment set up, make a sample recording in stereo, when your computer is “listening” to the microphone, and you’ll get a recording that shows two copies of the same recording, one on each channel. If your recording is short enough or you’ve zoomed in far enough, it should be relatively easy to spot any areas where one channel’s recording differs from the other, but if they seem to be exactly the same, that’s fine too—any differences will be clear after the next part is done.

Illustration 2: A sample sound wave following ICN processing. The original sound is shown in the top channel while the result of ICN is in the bottom channel.

Select one of your channels and use your software to “invert” the waveform. How to do this will depend on the software you’re using but the effect should be achievable in most, if not all, editing software. [Invert is in the Effects Menu of Audacity.] It is worth noting that the waveform will not look or sound any different after the inversion but the next part won’t work unless the sample is inverted.

Once you have one channel inverted you can proceed in one of two ways. Either the two channels can be averaged together or the contents of the inverted channel can be copied on top of the contents of the other channel. The first process will produce one mono file while the second process will produce a stereo file where one channel is a copy of the original and the other is the resultant ICN sound wave. Which you choose to use is personal preference.

Advantages for EVP study

The ICN process has the potential to allow for quick and simple removal of all background noise from recordings. The benefit for EVP study is a clear: recording where an EVP is present on one channel but not another; the EVP is quickly cleaned up and therefore made easier to understand.

Since a recording of all the original sound wave, besides the EVP, is being used as a filter, the effect of processing on the EVP itself is negligible. In the example created for Illustration 3, I was unable to discern any audible difference in the “EVP” created for the example and the original recording used to create it. By inverting one channel of the recording used to create the “EVP” and copying the result of the ICN filter on top of it, the result was a flat sound wave with no apparent difference in quality.

In summary, I believe the technique as presented here is a simple and effective tool for the study of EVP. Given the demonstrable advantages of filtering over other methods and the relative ease of including this technique into any computer-based EVP study, I believe the technique would benefit many people in their work.

Illustration 3a: A second voice recording has been added to one channel of our sample recording, to create an example of EVP. This illustration shows the original “EVP” recording.


Illustration 3b: Shows how the recording has been cleaned using ICN, to leave only the “EVP” on the top channel.

The only downside to the ICN technique is that, if an EVP is present on both channels, the ICN technique will filter it out but this flaw is countered by continuing to listen to sound files in the manner to which we have all become accustomed, then filter as necessary in a more conventional way. ICN is, therefore, an addition to the other tools at our disposal, not a replacement for them.

Editor’s Note: We think this technique has great possibilities, but there is one concern. The words of EVP are formed of the very noise being removed. It does appear that the power of the signal and time relationships are rearranged to form the words. Also, there may be a small “seed” signal that is not part of the ambient sound, so we think this technique may diminish the volume of an EVP, but the words should survive.

We have published this article because we feel that “field tests” of this technique would help us learn if it is a viable technique. Assuming the technique does help, we are also looking for setup instructions for using it in Audacity and Audition, so please let us know your results if you try ICN.

By the way, you can also record into a stereo audio recorder and then transfer the file into a computer for ICN analysis.

Simple Optical Microphone

by David Mierzwinski (c) All Rights Reserved
Previously published in the Winter 2006 AA-EVP NewsJournal
Also see: Experimental Recording Techniques Using a Phototransistor

For nearly a year, I have been conducting various experiments in an attempt to enhance the chances of clear EVP captures. These experiments have led me down many different paths including the use of electromagnetic fields, Tesla coils, audio resonance in musical instruments, 13 tones, etc. In my most recent experiments, I have begun exploring the properties of light. This has been exciting and has produced some encouraging results. I would like to share a simple project some of you may wish to replicate and experiment with. Even if you do not succeed in getting EVP captures with this device it is still a very interesting “science project” and will provide yourself and others with entertainment and wonder.

About This Project

This project explores the unusual properties of light given off by a basic oil lamp. I discovered in my experiments, testing various light sources, that the flame of an oil lamp, when detected by a photodiode and amplified to a high degree, is capable of acting as a carrier to transmit sound. This “sound” is rather noisy by nature, and from what I have observed, can be used, along with our voices, by Spirits. In fact, to optimize this system, it is best to use your own voice to set up the link for maximum clarity and strength. This seems to be the optimum settings for Spirit voices as well.

Required Parts

The Burr-Brown division of Texas Instruments (www.burr-brown.com) makes the best combination of photodiode and amplifier I have found. This part is the “eye” or receiving end of the optical signal from the oil lamp. This part is all self-contained requiring only a few external connections and a nine-volt battery which will power the device chip for a year or more. I was able to find this part on eBay, or you can check with a distributor in your area (not Radio Shack). I bought my oil lamp from K-Mart. It is the large size lamp with a wide flat wick (important). The cost was around $7. The other parts and cables can be obtained from your local Radio Shack store.

Parts List

  • Oil lamp with wide flat wick and clear glass chimney
  • High quality digital recorder or use computer to record (Olympus VPN-240 PC used in my experiments)
  • Burr-Brown OPT101 single photodiode transimpedance amplifier chip
  • Nine volt battery to power chip/amp
  • Cables or project board and socket to mount OPT101
  • Radio Shack Mini Amplifier 277-1008C (used for set-up only)
  • Clear Voice Denoiser Software (for post processing filtering)
    [Editor: Audacity should provide the necessary noise reduction as well.]
Oil lamp light source, optical detector/amp mounted on “breadboard” material. Audio recorder connected at “microphone in” with cable equipped with two “alligator clips.” The small white box is the Radio Shack mini amp.


op_amp_pin_configuration
The component pin diagram for Burr-Brown OPT101 optical detector/amp. The end of the chip with a notch has pins 1 and 8.

Construction

Now, this is the part that requires patience; how you decide to construct will depend on your ability. I preferred to use a simple perforated project board and soldered with point-to-point technique. How you make the connections to the chip is really up to you. Keep lead lengths as short as you can so you do not pick up stray signals. I think Radio Shack sells wire-wrap and a hand tool for those who do not wish to solder. A socket for the chip is a good idea.

Use the component pin above as a guide to make your connections. This diagram shows the chip pin numbers looking from the top (window side), keep this in mind when connecting from the bottom or a socket. Make the following connections:

  • Tie together or jumper pins 8 and 3, we will then call this (common).
  • Connect your nine volt battery (Radio Shack sells a pre-made battery connector) Plus or red connects to pin 1; black or minus goes to common.
  • The only other connection goes to your recorder. I used a pre-made cable from Radio Shack that came with 1/8 mono phone plug on one end and a red and a black alligator clamp on the other end.
  • Connect as follows, microphone positive or “high” to pin 5, microphone minus or “low” to common.

Whew, that’s the hard part, are you still reading this?

Setup and Test

This chip receiver you just constructed is very, very sensitive to light and modulations of light. You can experiment with it in many different ways. Keep in mind it will pick up your ordinary room lights and you will hear the loud 60 Hz component of the light. It will pick up light from your computer screen and also light from an infrared remote or computer link. For the oil lamp microphone to work properly you must be mindful of these stray sources of light and work in an area where the only source of light will be the oil lamp itself. Also make sure windows are closed and there are no drafts in the room to cause undue vibration to the flame in the lamp.

Setup is easier with the use of the Radio Shack mini amplifier. The amplifier is not too sensitive to low frequencies so it has properties of a good filter built right in. Place your receiver (optical chip) at about the same level as the oil lamp flame so the light from the lamp falls on the chip window. Keep the lamp about two feet away from the chip.

Connect your output cable to the jack marked “Input” on the mini amp. Turn up the gain about halfway on the amp. You will notice if you turn up the flame on the lamp too high you will hear noise and flutter in the mini amp. Speak with a loud voice near the lamp. Adjust the lamp flame for the loudest clearest sound of your voice or an assistant’s voice. You may need to hold the amp near your ear to hear this signal. Find the “sweet spot” by adjusting the distance of the chip to flame and the flame size for best clarity.

Recording and Processing

Once you have optimized your setup for best clarity you can try some recordings. Simply plug into your recorder mic input and record. You can try silence or speaking in a loud voice or even playing music. You may notice you will have some of the same challenges as our Spirit friends in having the proper energy to be clearly heard. Speaking in a slow halting cadence seems to work well. Do not be surprised if your words are changed when using this device to record your voice. I suggest a script or another recorder used for control. Due to the noisy nature of this process, I recommend post processing of the recording. I found Clear Voice Denoiser used with custom settings to be sufficient. Basically, the low frequency component introduced by the flame needs to be suppressed so the voices can be more clearly heard. If you get to the point of recording, I will be happy to furnish you with the required custom settings that have worked the best for me.

Have Fun!

I hope this very simple technique works as well for you as I have observed. Do not be disturbed if your voice winds up sounding like a Spirit voice, it is the nature of this technology. Have fun speaking through the aether and hopefully you will have a breakthrough contact.

ITC experiments using Light Reflected from Water

©Margaret Downey – All Rights Reserved

As Margaret Downey explains her experimental set-up, “I have a Canon PowerShot A75 Digital camera. It allows me to do thirty seconds of video at a time. I leave it on the highest resolution (640 x 480 pixels). For effects, I use the function button to set the camera to shoot in sepia (a brownish tone), tungsten (which makes it blue), and black and white. I also do a session using just normal settings.

“The experiments are done on my stove and the setup is very basic. The light in the stove hood is used as the light source. Then depending on my whim, I will use a black pot filled about half way with water or a translucent, amber colored Vision CorningWare pot half filled with water which I set either directly on the stove top or I suspend in the empty black pot. (editor: Margaret has joked that her Vision CorningWare pot really should be called Visionware!)

“I hold the video camera in my right hand and wiggle my left fingers in the water while I record the ripples. I get better results if I use my fingers rather than using a spoon or other object to stir the water. I first look through the viewfinder screen, to make sure I’m holding the camera at an angle where it catches the light reflection in the water. This position is not quite directly over it, but from above and at a slight angle. At the same time, I respectfully request for any people or animals in spirit who would like to show themselves, to please do so.

c2006margaret_downey-grandfather_composit_web
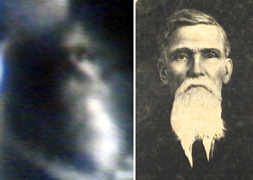
“Once in awhile, I’ll place a crystal or a crystal ball in the water. And sometimes I ask my hubby to shine red and blue lights in the water.

“After filming, I remove the compact memory card from the camera and place it into my computer. The file is transferred into a software program on my Mac called iMovie, which allows me to look at the video one frame at a time. When I see something in a frame, I’m able to save that single frame as a jpg file. And from that jpg, I crop out the image(s) I wish to keep. I keep both the unedited full frame along with my edited/cropped version. Once in awhile, I keep the entire video, but most of the time I dump it in order to help save hard drive space.”

c2006margaret_downey-a_man_web
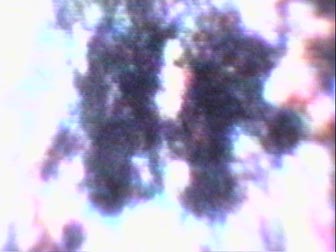
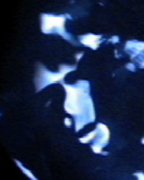
In one experiment, Margaret asked for her grandparents and received this ITC picture of a bearded man she feels is her Great Great Grandfather, Benjamin Franklin Main Sr. He was a physician and Baptist minister who crossed in 1913. Today, he and his grandson, Lewis (Margaret’s grandfather who crossed in 1993), help her in making connections to other people.

Steve is a friend of Margaret’s friend, Linda, who likes to “pop in” to Margaret’s EVP sessions to call Linda’s name. Linda had asked her to call on him and this is the image that showed up. Linda said that there is enough of a resemblance that she feels he was doing what he could to show himself to her.

c2006margaret_downey-indian_face_web
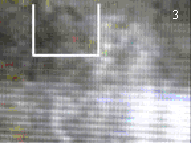
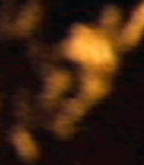
Margaret also has captured a picture of a face that she feels is her Indian guide, Walking Sun, who she had asked to come through during an experiment. Margaret had a reading from a Shaman who told her, “Margaret’s heart hears the drum beat of Mother Earth and her spirit finds the stairway to Father Sky.” She told Margaret that if she asked for her guide, Walking Sun, he would come. Margaret says, “One of the Shaman’s comments in my reading was that people with “dove medicine” can see between the worlds and the veil between earth and the spirit world is thin for them. She talked about being clairaudient and hearing spirit/sensing vibrations. It was so fun to be able to tell her after the reading about EVP/ITC!”

Margaret feels that she has gotten some excellent readings from people on the Internet and through eBay.


ITC Face Closely Matches Original

Update from the Spring 2007 NewsJournal

francksi2-1-from-daniele-gulla
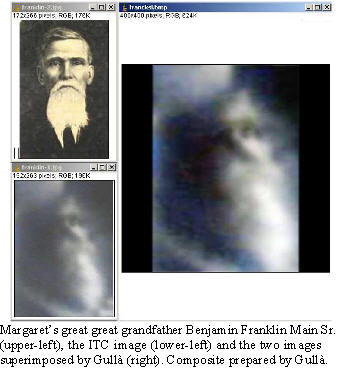
In the last NewsJournal, we reported about how Margaret Downey conducts visual ITC experiments using moving water for optical energy. The article can be read in the Techniques section of ATransC.org

Daniele Gullà, with the Italian ITC lab, Il Laboratorio (defunct), read the article and decided to see if his forensic-quality face recognition software would help compare Margaret’s ITC image with a photograph of her great great grandfather while he was in the physical.

Gullà wrote: “I have processed the human face as a 3D model and rotated it to superimpose over the ITC face. I have compared the repere [reference] points (only 5: eyes, lips, nasal and subnasal) in the human face and ITC face. The final result is that the difference in the two images is inferior to [less than] 5%. They are very similar!”

Selecting an Audio Recorder

Audio recorders models on the market frequently change, and for this reason, we do not recommend particular recorder models. Instead, we will try to provide a list of recommended characteristics and note specific model problems as we learn about them.

In general, an audio recorder that is effective for EVP will have the following characteristics:

Sidebar

Background Sound

The current working hypothesis is that the voice in EVP is formed by transforming available audio-frequency sound energy. Thus it is referred to as “transform EVP.” EVP are thought to be formed in the input, analog stage of the recorder, but otherwise, the recorder is just to make a record of the EVP and the practitioner’s voice.

Experience is showing that a microphone is only important to introduce additional noise if the noise generated internally by the recorder is not useful for voice formation.

A very high-quality recorder produces very little internal noise but a low-quality recorder typically produces too much steady-state noise, which is not useful for EVP.

Current understanding is that noise in the voice range–400 to 4,000 Hz–with many perturbations, such as small noise spikes, is useful for voice formation. The noise is needed for voice, but the perturbations are apparently useful to initiate the voice formation process.

The Panasonic RR-DR60 produces this kind of noise internally, but it is possible to produce it externally. One technique is to rapidly sweep a radio dial. This is not radio-sweep as used in ghost or spirit boxes. That technique sweeps the dial in two to four seconds and may produce whole words in the output file. The ATransC does not consider the result of radio-sweep to be EVP. The objective is to sweep the entire dial in under a second so that no whole words or even allophones can be detected. The objective is the resulting noise and not the “whole” sounds.

Voice Operated Recording Mode: This is essential if you plan on making many recordings, say at a haunted site, and do not have a lot of time to review sound files. Voice Operated Recording (VOR) can save considerable time for review. The added noise caused by the VOR switching on and off may also help in voice formation. Interestingly, the communicating entity is apparently able to trigger VOR when it is ready to speak. A good recorder should give you the option of using VOR or not.

Be sure to check the voice-activated recording mode for possible clipping of the first part of words.

Low and High Recording Quality Settings: Experience has shown that digital voice recorders work best for EVP, as compared to cassette and disk recorders. Digital voice recorders, operating at relatively low sample rates, produce more EVP than at higher sample rates. The point of this is that low quality or long recording options usually have lower sample rates, therefore more internal noise and therefore more EVP.

Human voice is between 200 and 4,000 Hz. A sample rate of 8,000 Hz is sufficient to reproduce that range.

Adjustable Microphone Sensitivity: Field recording often involves recording in places with many people talking or a lot of traffic noise. It can be very difficult to avoid these external noises and they may be too much for EVP recording. Decreasing the sensitivity of the microphone may help. At the same time, there are occasions in which the recorder is not producing sufficient sound for voice formation, and the room is too quiet. Increasing the sensitivity of the microphone may help.

It is possible to create a “sea in a shell” effect by putting the recorder or microphone in a container, such as a coffee cup. Others sometimes rub the microphone against cloth. Be creative, but avoid unconsciously making sounds that seem like voice.)

A “Hold” or “Lock” Feature: Using this feature will save you many accidental recordings that can use up your batteries.

Interface to a Computer: Newer audio recorders provide a USB port for transferring audio files to a computer; however, if the recorder does not provide a way to save the audio files, then use a cable between the earphone jack and the Mic In of the computer, and an audio management program to record audio files into the computer.

Quality Enhancement Features: Some recorders have settings that allow you to “enhance” the recordings to optimize voice quality. The features use special algorithms that enhance some frequencies and suppress others. It may be wise to make sure that, if your recorder has such a feature, it also has a way to turn it off.

The idea is to avoid unknown influences. There is much known about standard recording processes, but little is known about some of the enhancement techniques. For instance, do they substitute pre-recorded phrases to save storage space?

These are the main considerations when purchasing an audio recorder for EVP. The Association no longer recommends the use of a cassette recorder, although experimenters have used them for years before computers became available. If you just want to see if you can record an EVP, and only have a cassette recorder available, then us it. It will work. When using a digital recorder, remember that you will need to use your digital recorder with a computer for file storage and analysis.

Anything that can record voice will work. You can use a cell phone, the soundtrack for your video recorder or your mp3 player/recorder. Just remember that the rule of thumb is: The higher the quality of audio recorder, the more you will need to supply background sound.


Panasonic RR-DR60 Reset Instructions

Provided by James Jones

I received a DD DR60 in the mail today and when putting batteries in the unit it would not record because it showed that the recorder was “full” even though there wasn’t one file being saved. I found out that the unit just needed to be reset because if it is without batteries for a long time it can get confused the next time you put batteries in. Apparently there is some kind of flash memory in there that doesn’t depend on battery power and once you put some new ones in if things don’t match up properly, it gets confused.

I was able to reset the unit by taking out one battery, then holding the “mode” button and the push button “Play” wheel down while inserting the battery. This reset the unit and now it works.

I found this procedure on the paperwork included with the unit.

Basic EVP Recording Technique

Also see: White Paper on  Transcommunication with emphasis on Electronic Voice Phenomena

What is EVP?

Electronic Voice Phenomenon (EVP) are intelligible voices found in recording media that have no known physical explanation. Many of the voices are thought to originate from deceased people. This is the primary reason that people first began experimenting with EVP.

Characteristics of the Voices

The recorded voices may be very quiet and may be difficult to hear and understand. Most EVP experimenters say that they have developed an “ear” for the sounds after learning to distinguish them from background noise. In transform EVP, the voices can often be recognized as male or female, young or old. Messages are seldom longer than two to four words. The words may be spoken very quickly, and there is often a distinctive cadence to the voices. Analysis shows that they are simulations of voice made from whatever sound is supplied, and are often missing voice box frequencies and have oddly arranged formants.

Types of Recording

In controlled conditions recording, it is possible to control ambient noise and supply special forms of background noise. Biofield energy is thought to accumulate in a “special” recording area, which is thought to help make contact. In field recording, it is difficult to control environmental conditions or supply background sound, but in known “haunted” locations, the energy helpful for contact may already be present.

EVP formed in an audio recorder by transforming available background sound is referred to as “transform EVP.” In this, it is sometimes possible to recognize the voice of the speaker. EVP formed by sweeping a radio dial, or with a computer program such as EVPmaker, are referred to as “opportunistic EVP” because sounds for voice formation must be made available on an “as needed” basis. Radio-sweep also known as “ghost boxes” or “spirit boxes,”), and in some applications, EVPmaker, depend on the use of “live” voice. ATransC will not use live voice examples for research because of the problem of undetected false positives. EVPmaker using synthesized voice is preferred for opportunistic EVP.

Environmentally stimulated speech synthesis is a relatively new and promising technique, but it should be noted that all speech synthesis approaches currently being tried do not support speaker recognition.


Recording Procedure

Recording Equipment

Digital voice recorders are recommended for transform EVP. Less expensive models produce more internal noise which is useful for voice formation. High-quality units will probably require added background noise. A computer can also be used, but will probably require added noise.

Scheduling

Entities will speak at any time of day or night. In the beginning, however, it is advisable to record at a regular time and place. By doing this, the entities learn when there will be an opportunity for contact and expectation of the upcoming session helps focus attention on the process. Try to find a place that will be quiet and free of interruptions. Background sounds are okay, but it is important to be aware of these so that they can be distinguished from the EVP.

Background Sound Source

Research has shown that for transform EVP, the entities use sounds in the environment to help form the words. Most recording situations have some background sounds, but it may be necessary to add noise with something like a fan or running water. Some people use foreign language radio, crowd babble or audio tapes; however, as more has been learned about EVP, the recommended practice has been to avoid the use of radio static or live voice of any form.

Preparation

Begin with meditation and a short prayer to ask for only those intending the highest good and an invitation to friends on the other side to participate. It is best to record when personal energy is the highest.

Recording

Vocalize your comments during an EVP session. The entities will often come through as soon as the recorder is turned on. These beginning messages may be the loudest, so it is a good idea to turn on the recorder and wait a few seconds before speaking. Questions should be recorded, and a period of time between each comment should be left for the entities to respond–about ten seconds. At the end, ask if the entity has something to say.

It may help to make an “appointment” with the intended entity the day before, during prayer or meditation. Some also provide feedback before the session so that the entities will know what worked in the last experiment. It is not necessary to record in the dark. People often try different devices and energy sources to help the entities communicate. Leaving written questions in the EVP experiment area the day before has worked for some.

Keep recording short. Recordings should be closely examined, at least until it is understood where to find the voices. A best practice for field recording is to use two recorders. As a rule, EVP will only occur on one recorder or sound track, making it possible to avoid mistaking local sounds for EVP (false positives).

Playback

In transform EVP, the voice is usually not heard until playback. Experimenters report that the voices tend to become stronger and clearer as the entities gain in experience, but at first, the voices may speak in whispers. Voices may not be recorded in every session and it may take several sessions to discover the first voice. Hearing the voices is a learned ability. It might take thirty minutes to examine a three or four-minute recording.

Classes of Voices

The following system of classification is based on a proposed Best Practice at atransc.org/classifying-phenomena/. You are invited to participate in developing the practice. Please use the Contact tool to let us know you are interested.

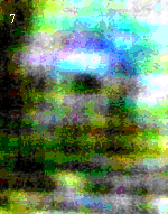
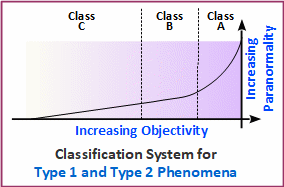
A distinction is made between phenomena which are always present and phenomena which are transient features. A face seen in the decomposition pattern of a leaf is more or less always there, as opposed to a face found in moving water or video-loop noise. As a general rule, “always there” phenomena appear to be formed by opportunistically adapting naturally occurring processes to express the message, assuming one is intended. If perceived as phenomena, “always there” features would be considered Type 2.

Features found in ever-changing noise are thought to be formed by transforming that noise into the voice or face. While the resulting features are fleeting unless caught in media (photograph or audio recording), they tend to be better formed and more easily identified as anomalous. So for both audible and visible phenomena:

Type 1: Transformed physical media; not always present
Type 2: Always present; often as a persistent artifact

Both Type 1 and Type 2 examples are divided into three classes:

Class A: Evident without explanation
Class B: May require directions
Class C: Maybe vaguely experienced; mostly obscured by noise

Keeping a Log

Maintaining a record of recording results is very helpful. Include the date, time, seconds into the recording, the message itself and the question asked. Be sure to label and save the audio file so that they can be found at a later time. Experimenters report that they feel weather may affect results, but this has not been well studied.

Digital Voice Recorders

Digital voice recorders are recommended for EVP experiments. Today, all sound-tracks—digital or analog—should be listened to in a computer and with a headset. Unlike tape recorders, the built-in microphone is usually satisfactory for EVP. Consider the selection guide for audio recorders here. Audacity is an effective audio management program that can be downloaded at no cost.

Computer Recording

A computer instead of a digital recorder can be used for recording EVP. It should have an audio input jack, speakers, headphone jack and sound player application such as Audacity. Most experimenters use the computer to analyze and store examples. If the recorder does not have a USB interface, it is possible to play the recording into the computer while recording with a recorder program. The Earphone jack of the recorder can be connected to the Microphone or Line 1 jack via a cable. The sound source should be set to the correct jack via the pull-down menu in Audacity. Recording with a sample rate of 11025, mono and 16-bit resolution is sufficient for EVP. Files should be edited as *.wav format but shared as *.mp3.

Analyzing the Recording for EVP

Always use headphones when listening to the recording on a computer. The earmuff style that completely covers the ear is best, but also good are the soft rubber earbuds that are inserted in the channel of the ear.

Be sure to set up a method of saving your recordings in your computer that will allow you to easily locate examples. A good practice is to save the raw recording session in a dated folder and then also save clips containing the EVP in the same folder. Field recordings are saved under the name of the location and the date. It is helpful to keep a separate folder for your Class A examples for easy retrieval for demonstration to friends. ATransC follows the labeling practice of (c)lisa_butler2008-what_evp_says.mp3. The (c) symbol indicates the intention to protect rights to the example. If you are making the example available under the Creative Commons license, then use (cc) instead of (c). Using first and last name helps sort many examples in the folder for easy retrieval. The underline and dash symbol with no use of capitals helps assure that computer systems and the Internet accepts the name. A 200 kb audio file can be reduced to around 15 Kb when converted from a *.wav file to an *.mp3 file. This makes it easy for sharing files via the Internet.

Recording EVP Using a Telephone

debbie-telephone-evp

Debra Ann’s Telephone Recording EVP Using a Telephone
Previously published in the Spring 2007 ATransC NewsJournal
Also see: Phone Line EVP and EVP Using VoIP and Telephones

Please note that Debbie has made her transition to the other side

Debbie Caruso has been learning to use a telephone and computer for recording EVP. The results have been very promising. She has always been one of our braver members who is willing to try new ideas and record for others. Recording for others is a challenge because it takes quite a lot of time and most people need to learn how to hear examples that are not always Class A.

The elements of Debbie’s setup are shown in this diagram. Of course, a computer is used, and a recording program such as Audacity or Audition. She is using HyperTerminal to control the modem for phone connections. It comes with Microsoft Windows:

debbie-telephone-evp
EVP recording arrangement used by Debbie Caruso

Legacy: Start > Programs > Accessories > Communications

In Windows 10: Type “Hyper-V in the “Ask Me Anything” window and check mark “Hyper-V” in the “Turn Windows Features on or off” widow.

She uses a telephone set connected to a second telephone wall jack, but she could use a headset equipped with individual jacks that connect to the Headphone Out and Microphone In jacks of the computer.

If modem and control software are not available, Radio Shack sells a “Recorder Control” for $27 that Debbie has used with success. See model number is 43-228. This unit connects to the telephone jack and plugs into the computer’s Line In or Microphone In jack.

Debbie arranges with a person or persons with whom she will record to call her, and with the computer connected to the line, she is able to speak with the callers and record the conversation. Once the connection is established, the recording session is conducted as if she is in the same room with the other person and using a standard audio recorder. It is also possible to have a second telephone receiver off hook and near a fan or some other sound source.

A telephone line is designed to provide enough feedback from the microphone to the speaker to give the sense of a “live” circuit. This is a byproduct of the conversion from two-wire between the home and the central office and four-wire between central offices. It is known that a little feedback in the EVP circuit sometimes helps for EVP.

Sonia Rinaldi uses a similar setup for recording and has been very successful in making contact with loved ones for families. However, there is little public information about her methods, so Debbie is taking the old “trial and error” approach. It seems to be working, though. Martha Copeland wrote, “Debbie has been experimenting on her own, and I happen to be one of her guinea pigs! On our first experiment we picked up my daughter, Cathy’s voice saying, “Keep trying.”

Participants in group sessions call into (now out of service) ConFreeCall.com, an online conference service. The group first discusses what they want to ask, and then Debbie begins the recording process. Four or five questions are asked during a one-minute, forty-second recording session. Some of the participants record at the same time. While everyone is still on the line, Debbie plays back her recording so that all can hear what may have been recorded. Others who have recorded also review their recordings during the call so that the results can be shared before the session is ended.

As Debbie explained, “The conference calls are a great way for a lot of people to record together. When recording for the Big Circle (BC), we all call in at 8 PM, ask “Who’s here from the BC?” and then wait approximately one-minute, forty-seconds in silence. We play it back, see if anyone answered and that helps us decide our next question.

“Other than the BC, there are no set schedules. People will want to record and we’ll just meet in the Conference Room at a time convenient for all. It’s just an easy way to record with a lot of people. What I would like to concentrate on now is people meeting to record for one specific person. I would love for many family members to be in the room to contact one special person.”

Because of the possibility of overwhelming Debbie with requests, please contact her via a personal message in the Idea Exchange. She wants to help as many people as she can but please understand that she may not have time to meet all requests. We encourage others to try the computer/telephone technique. Also, the conference room approach to group recording offers some interesting possibilities. Let us know if any of you have successes to report.

Examples of Debbie’s work may be listened to here

EVP Using VoIP and Telephones

margaret-telephone-evp

Originally published in the Fall 2012 ATransC NewsJournal
Also see: Phone Line EVP and Recording EVP Using a Telephone

Recording for EVP using the telephone system has always offered tantalizing possibilities. In recent years, cell phones and answering machines have produced good but usually spontaneous EVP. Now, we see more people using the Internet for planned EVP sessions.

Voice over Internet Protocol (VoIP) is the technology that makes it possible for a person to use a computer to call another computer via the Internet or even call a landline telephone via the Internet. The most commonly used service has been Skype.com, but others are coming along, including Google Voice (google.com/voice).

This article describes some of the more successful techniques being reported to us by members and associates.

Sonia Rinaldi

EVP recording arrangement used by Sonia Rinaldi

Brazilian researcher, Sonia Rinaldi, is a veteran transcommunication researcher. With members of the organization she coordinates, IPATI (translation from Portuguese: Institute for Advanced Research in Instrumental Transcommunication), she has been diligently seeking ways to improve both visual and audible communication across the veil. We have included a number of articles on her work over the years which may be accessed in the Idea Exchange archive.

The Idea Exchange has been converted to “Read Only” due to lack of participation.
Please contact us if you have questions.

IPATI has been a leader in developing new techniques for EVP using the telephone system and Skype. A major part of Sonia’s work involves reunions and she has produced some very convincing results using these techniques. We asked Sonia to elaborate on her current setup. Here is her answer with the help of Sonia’s translator, Cristina:

Description of Technique

This is the configuration of equipment used by Sonia Rinaldi for her recent work with reunions.
In the laboratory: a speakerphone is placed beside a laptop configured to record via a microphone.

The client, who is anywhere in the world, calls that phone via a computer using Skype (voice only). The telephone is answered by the practitioner (Sonia in her reports) who initiates the recording session in the computer, sets the telephone to speakerphone mode and leaves the room.

The practitioner then goes to a second room in the same building and picks up an extension phone located near a television. As a sound source, the television is tuned to an English or German-language news channel (any language other than the practitioner’s native language).
Via the telephone, the client speaks to his or her loved one on the other side while the practitioner listens to make sure that the client asks questions while leaving a thirty-second pause for the etheric communicator’s response.

In this technique, the voice from the television, as the background sound, appears to be transformed to produce answers from the loved one. While the background sound is in one language, the resulting utterance is in Portuguese.

Preparation

The client is instructed to prepare questions before calling Sonia’s lab in Brazil via Skype. From client Christina, “Before calling Sonia’s lab in Brazil, I prepared questions to maximize the communication with my son Stefano. I also decided at the last minute to call from my bedroom, the quietest place in the house.”

After the call is connected: “All of a sudden Stefano validates his presence by saying that I was in my room, something I had not mentioned because it was a last-minute decision. I could clearly hear my parents and husband as well, which gives me the hope that I will rejoin my loved ones sometime in the future.

“Another communication that amazed me was his suggestion that I contact a friend and girlfriend of his: Lina.

“I contacted Lina the next day and she told me that it was an amazing ‘coincidence’ that I called. She had been thinking of Stefano and had decided to call me the same day to take me out for lunch. We had lunch together and she surprised me with a gift: a heart-shaped silver locket and chain bearing the words on both side: ‘Stefano, ever loved, never forgotten.’”

Debbie Caruso

debbie-telephone-evp
EVP recording arrangement used by Debbie Caruso

As reported in the Spring 2007 ATransC NewsJournal, “Recording EVP Using a Telephone,” before her transition, Debbie Caruso had been using a landline telephone and computer for recording EVP. The elements of her setup are shown in the following diagram. A recording program such as Audacity or Audition was used in the computer. (Use Phone and Modem in the Control Panel to control the modem in Windows 7.) A telephone was connected to a second telephone wall jack, but she sometimes used a headset that connects to the computer.

An example of what Debbie was recording is in the article, “Jenny and Brandon – The Newlyweds

Margaret Downey

margaret-telephone-evp
EVP recording arrangement used by Margaret Downey

Margaret Downey uses an Apple computer and iPhone to conduct VoIP sessions. With two Skype accounts, she calls one with the phone and the other with her computer. Both are in the same room but about eight feet apart. A sound source plays into the room near the cell phone.

During the call, Margaret’s voice from the cell phone plays out of the computer speakers. A feedback loop is formed because the phone picks up Margaret’s voice, the background sounds and the output of the speaker. So, if the phone is too close to the computer speakers, there will be a loud “feedback” noise. Part of the task is to find the best location for everything so that there is a little feedback, but not enough to cause the loud noise.

When the call is answered with her computer, Margaret starts an app named Call Record (ecamm.com). (A similar Windows app is PrettyMay Call Recorder: prettymay.net.)

An interesting observation about Margaret’s setup is that the call recorder displays both sides of the conversation so that the caller’s voice is strong on the receive side but also slightly delayed. The send side also has the caller’s voice but much weaker.

Using Live Voice Input Files for EVP

Previously published in the Spring 2012 ATransC NewsJournal

Several members in the Idea Exchange have been using recordings of foreign language as background sound for EVP sessions. What we refer to as “live voice” is not understandable to our English-trained ears so there seemed to be little danger of mistaking the input speech for EVP. Well, … that is the theory.

We used the same foreign-language input file for the Big Circle recording sessions over six months. This gave us ample opportunity to test the technique. What we found has been a real eye-opener. Both of us recorded and nearly every utterance one of us identified as an EVP could be found on the other person’s recording and the original sound file.

Each session, we played the foreign-language sound with a Sony ICD-B26 and recorded with a pair of Panasonic RR-DR60s placed about two feet away from the Sony. The only other sound in the meditation room we used is the normal, ambient sounds one would expect from a closed room with no forced air movement. Lisa typically turns off the Sony while we ask a question and then turns it back on while we seek a reply. DR60s are always in VOX mode.

The input file includes both male and female voice, making it easy for us to locate segments to compare. Because we did identify a few utterances in the input file that sounded a lot like English, we began comparing the two output sound files to see if any suspected EVP were in both. As it turned out, the majority were.

The current best practice for field recording is to use two recorders and discard anything found in both recording processes. (See: Using a Control Recorder for EVP) This is a good practice because it is well established that EVP occurs in one analog segment so that two recorders will not “normally” record the same EVP.

EVP does occur as a transformation of the foreign language into English words, but based on our study, naturally occurring sounds in the foreign language are too often mistaken as English. This is enough of a problem to warrant recommending that, when using live voice, two recorders should be used and both output files examined to assure suspected EVP are only in one of the files.

This recommendation applies to all forms of live voice including recording with EVPmaker, radio-sweep, and of course, foreign language speech. The opportunistic presence of English sounding words does not automatically mean transcommunication. This is especially true of short utterances, for instance, “yes” and “help.”

The best practice for using a control recorder will be updated in the Collective forum and a new one for live voice will be started. These practices are considered “living documents,” and will evolve as we learn. You are invited to help us develop these and similar articles. Your viewpoint is important and may help many others as a practice.

Video-Loop, Visual ITC Recording Technique

Also see Butler ITC Gallery 2Butler ITC Gallery 2,  Butler ITC Gallery 3,
and Perception of Visual ITC Images

A Brief Discussion of the Pictures


The ITC images described by Lisa in Butler ITC Gallery 1 provides an interesting study in ITC photography. The initial video was taken with a Cannon 8mm ES2000 analog camcorder set about three feet from a Sony KV20TS32, 20-inch Trinitron color TV. The camera was focused just beyond the screen surface and the composite video out of the camera was connected to the video input of the TV so that the camera was “seeing” its output in a video loop. The camera was zoomed so that about five inches of the screen was revealed to the camera.

An example of the video loop is shown above. It is a highly compressed file and the phenomenal features normally seen in the higher resolution NTSC format are not as clear. Even so, move the track market to 01, 06 and 08 seconds and look for phenomenal features. An analog camera and monitor has been most effective for us. We adjust the camera for a balance between very sharp-pixilated display and a too-soft display. Experiment to find that balance. Look for the features in the medium bright areas.

The resulting video clip was loaded into a computer and Pinnacle Systems Studio DC10 Plus was used for review. The video was examined frame by frame and interesting frames were captured as individual pictures. Figure 1 is an example of these “grabbed” video frames. Because we were focused on an area of the screen that had a lot of optical texture, the resulting frames tended to be dark. The screen was also flashing from light to dark. While this seems to have given us ITC, it has also frustrated our attempts to display the images with our method of printing this newsletter.

We sent two of the more interesting frames to member, Erland Babcock, who edited them to produce Figure 2. Erland uses editing software that came with his Toshiba PDR-M70 digital camera and it is more effective than any of the editors we use. Lisa had seen other possibilities in Figure 1, but I was focused on what looks like a full-bust image of a man in the middle of the frame. If you look at the upper left quadrant of Figure 1, you can see that I have highlighted what looks like a hat. Figure 2 is that region enlarged and enhanced. With this image, and other renditions not shown, you can see a man wearing a hat. It looks like he has a full beard. There is evidence of blue sky above him and shrubbery at his right. His shoulders may also be visible.

It is important to note that the resolution of the original frame should not support the fine shading of the shape of the hat. In other words, I believe that the ITC image has higher resolution than the original frame. Also, if this were an illusion, we would expect to more often see other familiar objects. Erland has pointed out to us that he has captured pastoral scenes and what looks like aerial views of land and water. But we are mostly collecting faces, which raises the question again, why faces, why whole faces and who are they?

We have included an image showing a full head of a person in Figure 3. The original frame was almost completely black, so what is shown here is an enhancement. It is hard to tell, but the person looks a lot like an extraterrestrial standing in front of a round window.

   techniques_itc1_2  techniques_itc1_5
Figure 1

A full video frame

Figure 2

This picture was cropped from the frame in Figure 1 from the area marked with a white box. The intensity and contrast has been changed in a photo editor to make the feature more visible. No color has been added.

Figure 3

A feature that has been cropped from a different video frame that was almost black before the intensity was changed in a photo editor.


 butler_faces_1  
Figure 4

Typical texture in video frame when the camera is three to five inches from the television screen. Notice that you can see the texture of the pixels. All of the examples in Butler Gallery 1 and 2 in the Examples pages were collected with the camera very close to the screen. You will notice that the pixels tend to dominate the features. (Please note that the framer has been rotated 90 degrees.

Figure 5

Typical texture in video frame when the camera about three feet from the television screen. Notice that you do not see the texture of the pixels. All of the examples in Butler Gallery 3 in the Examples pages were collected with the camera three feet from the screen. You will notice that the features tend to be softer in texture.

Steps in Recording Video-Loop ITC

We use what is known as the Schreiber method for Video ITC. The technique of connecting the output of a video camera to the input of a television set, and then taping the video noise that can be seen on the television screen, was apparently first developed for Schreiber by Martin Wenzel.caaevp2004_video_setup


  1. Preparing the Video Loop: Position the camera about three feet in front of the television screen. Connect the Video-Out of the Camera to Video-In of the television and select Video-In on the television set. Aim the camera at the television set and slowly adjust the focus, and zoom until the dark to light flashing is visible on the television screen, with cloudy or foggy texture in various colors during the bright flashes. The focus should be six to twelve inches past the surface of the screen when the equipment is ready to record. The most important objective is to see swirling clouds.
  2. Preparing Yourself: Follow the same preparatory process you use for EVP sessions. Remember that there are nonphysical entities who are present and able to “witness” your activity. Consider using the same music each time as a “signature” or “signpost,” indicating that preparation for a session is underway. Also consider conducting a short meditation or prayer.

After meditation, we change from music to the background sound that we use for EVP. The background sound of white noise is used because we always listen to the video sound track. Also, an IC recorder is usually recording during the sessions. This, of course, is optional. Speaking out loud, we talk to our team about the last session and discuss the various successes or failures of that experiment. Asking for their assistance in bringing the images through, we announce that we are going to begin the experiment. This is all done just as if they were standing in the room with us. Each session brings different discussions and questions. Ask for information on how to improve the experiments, and for specific people to show themselves in the video.

The experimenter is part of the circuit and we feel that meditation and/or prayer helps bring the experimenter into a more balanced state. This helps to focus the experimenter’s intention and better helps those on the other side create a link to the experimenter.

  1. Conducting the Experiment: Speaking out loud, tell the entities that you are about to begin recording. State what you wish to see in your video frames, and perhaps, offer feedback about the previous experiment. Turn on the equipment and wait a few seconds for the feedback loop to stabilize. Record for about thirty seconds. You may record longer, but remember that the camera will record around twenty-nine frames a second, and that thirty seconds represents a large number of frames. Turn off the video camera and verbally thank the entities for their help.
  2. Analysis of Video: Transfer the video onto a computer. You can alternatively include the computer in the recording circuit during the experiment and record the video with the computer rather than with the camera. Once in the computer, examine each frame of the video and “grab” frames that have optical texture, such as blotches of color. Examine each grabbed frame in a photo editor as if it were a photograph. Use magnification, intensity changes and rotations while looking for features.

We highly recommend that you read the section about Video ITC in the book, There is no Death and There are No Dead.

The Monroe Way

Binaural synchronization induced meditative state
Previously published in the Spring 2008 AA-EVP NewsJournal

Robert Monroe had spontaneous out-of-body experiences, which are well-documented in his books, Journey out of Body (Doubleday, ISBN: 0385008619, 1973) and Far Journeys (Doubleday, ISBN: 0385231822, 1985). An engineer, Monroe owned a radio production company, and so it seems natural that he would turn to audio technology in his efforts to understand his experiences. Before his transition, he “discovered” Hemi-Sync® and the Frequency-following Response.

Robert had a penchant for acronyms and frequently described the etheric worlds in which he traveled in terms that were catchy but often used to represent unfamiliar meaning. For instance, he used the term, “Locale,” to describe a region of reality and while we are still more or less associated with the physical in Locale I, we see in the transition to Locale 2 that we leave things physical behind.

Robert Monroe is on the other side now, but his legacy is maintained as the Monroe Institute. The Institute provides on-campus classes and well-designed home-study packages. In general, students listen to a series of audio programs in which they are verbally, and with subtle audio signals, guided to deeper and deeper levels of awareness. These programs are intended to be used as a training tool to help the mind “recognize” these levels, and thereby, more quickly return to their associated states of mind.

We have attended three, one-week classes and have even met Robert. His daughter, Laurie Monroe, spoke at the 2006 AA-EVP conference. Our experience with the Monroe training programs is that they are a powerful tool for self-development and are potentially important for people wishing to develop their mediumship abilities.

The Monroe experiment mentioned in the Viewpoint will test this belief with a series of EVP recording sessions with and without a special set of frequencies.

The Technology

Robert Monroe discovered that the two hemispheres of the brain will synchronize with the beat-frequency between two audio signals. Using representative numbers, a 1000 Hz tone in one side of a stereo headset and a 1010 Hz tone in the other will result in a response to the 10 Hz difference between the two tones. This is “Hemi-Sync.®” Further, if the difference between the tones is reduced, say to 5 Hz, then the brain will follow. This is the “Frequency-following Response.”

The levels of awareness in electroencephalograph biofeedback training for meditation are described as:

Beta (13-40 Hz): Awake and alert
Alpha (7-12 Hz): Deeply relaxed; meditative
Theta (4 -7 Hz): Between deep meditation and sleep.
Delta (0-4 Hz): Sleep

Biofeedback is used to teach a person to recognize a deep meditative state, and in the future, to quickly “go there” without feedback aids. In the Monroe system, binaural-beats (Hemi-Sync®) are used to teach the person the same response. In fact, you just relax and listen to the program as the hardly heard frequencies slowly move you into deeper and deeper levels of awareness. Even if you are disturbed, say by a passing car, the frequencies will quickly “pull” you back.

Robert referred to the first level, FocusTM10, as the state of awareness in which the body is asleep and the mind is awake. Focus 10 is the beginning place for most of the programs. We believe it is correct to say that, in terms of biofeedback, this would be roughly equivalent to the “Alpha Level.”

The Institute has scanned the brains of people reported by others to be very successful trance-channels and did find a discernable difference from people who did not trance. A set of frequencies were developed from these EEG maps and were used to develop binaural-beats for audio programs designed to help the listener sense the presence of other intelligences. These are referred to as “Inner Self-Helper” or ISH frequencies and brain mapping of “ordinary” people, while they were under the influence of the frequencies, showed that they were measurably effective in inducing trance-like conditions.

The Cosmology

There are many cosmologies describing how reality is arranged, and if you need a reference point, then it may work to say that Focus 1 is our waking state—body and mind awake, so that would be the physical. As the focus of attention is changed further and further away from the physical, there is a transition point at Focus 21. So Focus 1 through 21 is Locale 1. Focus 22 through 27 is Local 2, and beyond that would be Locale 3. In the more commonly held cosmology, Locale 2 would probably be thought of as the Astral Plane (level of existence), but one should not be too determined to relate the Monroe way with others. The Monroe way is based on direct experience that can be generally replicated in controlled conditions, so it is best to look for perceptual similarities amongst the cosmologies.

Here then, are the more important focus levels as described in the Monroe literature:

Focus 10: The first stage in separation of mind-consciousness from physical reality. “Mind awake/body asleep” is a deeply relaxed state in which awareness of physical sensory input is reduced, yet the mind is alert and attentive to experience. This gives birth to awareness that you exist with or without the physical body.

Focus 12: A state of expanded awareness in which you can become more conscious of inner resources and guidance; a powerful and empowering state which readily lends itself to many diverse applications.

Focus 15: A state of “no time” in which you explore beyond the constraints of time and place. Opportunities are abundant for establishing communication with larger aspects of self.

Focus 18: Self-love, self-trust, and non-judgmental acceptance

Focus 21: Like deep (delta) sleep, but with a significant difference. You are fully “awake” and conscious, directing the action, as you explore more deeply your personal self and the far reaches of other realities.

Focus 22: Where humans still in the physical can have partial consciousness, remembered as dreams, deliriums, and patterns induced through chemicals

Focus 23: Inhabited by humans who have recently exited physical existence and have not adapted to such change

Focus 24, 25 and 26: The Belief System territories where those who have exited the physical are residing in a particular belief system

Focus 27: The Reception Center, Way Station, or Park, designed to ease the trauma and shock of the transition out of physical reality.

Some levels are more “interesting” to one or another of us. Tom really likes working at Focus 15. Also, how the levels are visualized is very personal. He gets a lot of insights from people in spirit coming to talk to him in Focus 15 (no time) but others have described it as nothingness. Some people say that in Focus 15, they have learned to imagine themselves moving from a center, along spokes of a wheel to the circumference where they are able to go forward or back in time. Lisa likes to use Focus 15 to visualize what she would like to manifest and feels that Focus 27, The Reception Center, is the easiest focus level to use to meet with loved ones and friends now on the other side.

Experimental Recording Techniques Using a Phototransistor

cd_mierzwinski2007-recording-candlelight

Previously published in the Spring 2007 AA-EVP NewsJournal
©David Mierzwinski – All Rights Reserved
Also see: A Simple Optical Microphone

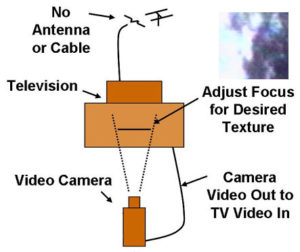
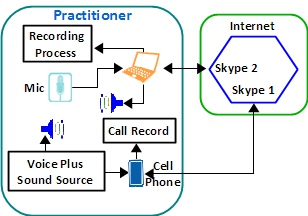
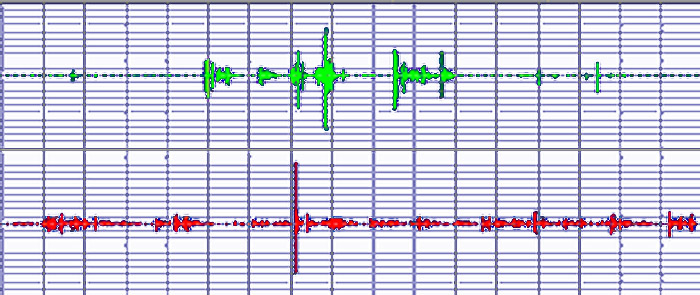
This article presents an experimental approach for making EVP recordings. Its purpose is instructional and to help promote an understanding of vibrational energy and how we may better perceive it.

I’m going to share with you a few simple techniques for recording lightwave vibrational energy. This is energy which is beyond what we may see and hear every day. A good example is a common household light bulb. You see the light and can feel the heat produced by it; however, you cannot hear that the bulb is being modulated by the 60 Hz line current. You may be surprised at the amount of “sound” that is silent to us, some man made and some perhaps not.

cd_mierzwinski2007-photodiode_recorder
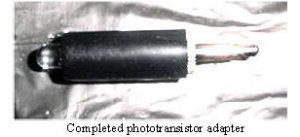
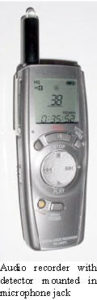
The technique involves use of a single, widely available electronic component called a phototransistor. This is not the same as a diode which was used by early EVP researchers. The phototransistor I recommend is available at any Radio Shack store or available from them online. The part number is 276-145. My tests have shown that the device is responsive to infrared, visible and ultraviolet light. All of these frequencies of light mentioned are well above radio broadcast, cell and microwave transmission frequencies.

You can make a simple plug-in phototransistor adapter for your digital recorder. All popular digital recorders I am aware of use internal electret microphones. With these recorders you can use the external microphone jack. The recorder will provide the small voltage the phototransistor requires to operate at the external microphone jack. The 1/8” phone plug common to most recorders is Radio Shack part number 274-286.

cd_mierzwinski2007-photophone
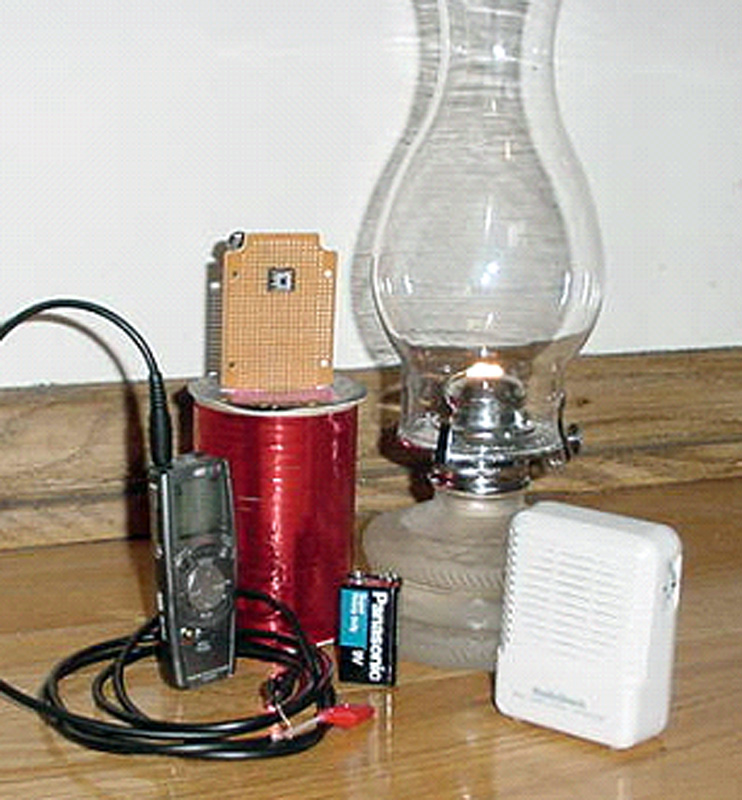
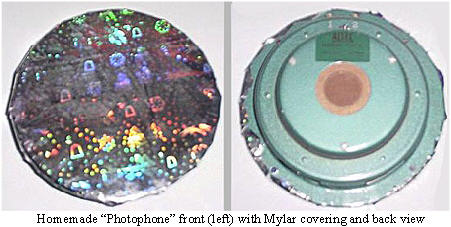
Solder the phototransistor to the phone plug as follows: The phototransistor has a flat edge on its case, this is the collector mark. The remaining lead is called the emitter; Connect (solder) the collector to the short pin of the phone plug; and, the emitter connects to the long pin of the phone plug. The photo shows the completed assembly ready for use.

Plug the completed adapter assembly into the external microphone jack of your portable digital recorder and start exploring. Try recording various light or even heat sources; you can unplug the adapter at any time and make a verbal notation of the source. Plug it back in and continue. You will hear different sounds when you record various sources like candles, light bulbs, computer monitor screens, TV sets, remote controls or a fireplace.

cd_mierzwinski2007_testing_photophone
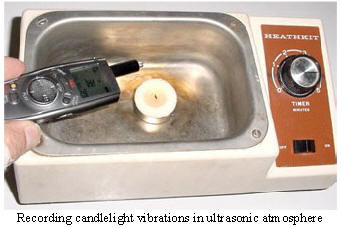
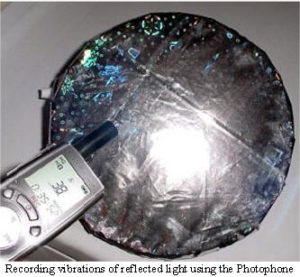
For example, a quartz-tube space heater at full power (glowing) will produce a very pure thermal white noise. Place the recorder in your car and drive around. You may be surprised at what you can hear in the filtered sunshine as the levels of light change as you drive. If you have a crystal or mineral collection you may try recording reflections or direct light shined through a crystal (sunshine, LED flashlight or a laser pointer works well).

Would you like to hear your own voice through the vibration of light? Here is a simple device you can make for a number of interesting experiments. It is based on A.G. Bell’s Photophone invented around 1880. For my model, I used some reflective, shiny, very thin, gift wrapping plastic (like a Mylar or Saran plastic). I taped this film very tightly (like a drum) over the front of an old eight-inch diameter audio loudspeaker.

cd_mierzwinski2007-recording-candlelight
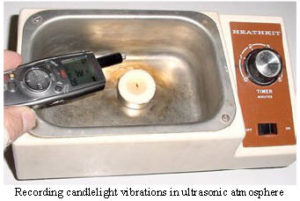
Hold the completed Photophone so sunlight reflected from the surface of the shiny, flexible mirror shines on the phototransistor. Now speak closely and loudly to the surface of the Photophone. On playback you should hear your own voice. The quality will depend on how well your voice vibrates the surface of the Photophone. For more controlled experiments, you can connect the loudspeaker to a stereo or amplifier and play different sounds through it to vibrate the film. Just place the speaker so that sunlight reflects from the surface to the phototransistor. Try using music, Spiricom tones, babble or even white noise, as an example.

Another technique is to provide external vibration to a light source and record the result. Pictured is a small tea candle placed in the well of an ultrasonic cleaner. The candle is in a small amount of water, lit and the cleaner turned on in a darkened room. The recorder is held clear of the cleaner and pointed at the candle which flickers at a very high rate in this atmosphere.

cd_mierzwinski2007-photodiode_cable-old
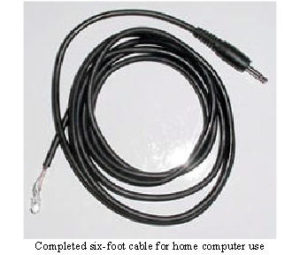
You may wish to build a phototransistor cable that can be used with your home computer sound card for recording. The Radio Shack part number of the cable to use is 42-2434. The six-foot cable has a molded 1/8” plug on one end and tinned leads on the other end, ready to connect the phototransistor. The connections are as follows: inner conductor of cable connects to phototransistor collector (flat edge), outer (shield) connects to emitter.

An interesting experiment that has yielded good results has been the optical microphone. The optical microphone is a commonly available oil lamp. The only oil lamp style that has worked so far has been a lamp with a three-fourths inch wide wick. The wick that comes with cd_mierzwinski2007-oil_lamp
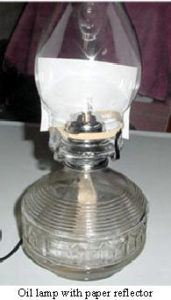
these lamps is cotton and works well. I have begun tests with other wick materials as of this writing. I attach the phototransistor and cable assembly to the lamp with a thick rubber band. A reflector is required to be placed behind the phototransistor. A white 3 x 5-file card is excellent for this purpose. This simple reflector greatly increases the gain of the microphone. If your sound card allows audio monitoring, you can experiment with the flame level for best reproduction of your voice. A high flame level can overload the phototransistor. Start with a low flame and ratchet it up slowly. Speak into the chimney of the lamp or across its top if you are sensitive to the exhaust fumes. Use an ultra-pure liquid paraffin lamp fuel for lowest odor.

Have fun exploring the under-researched areas of light energy vibrations with these unique recording techniques.

Sidereal Time and Psychic Phenomena

From the article:

Apparent Association Between Effect Size In Free Response Anomalous Cognition Experiments And Local Sidereal Time, by S. James P. Spottiswoode, Cognitive Sciences Laboratory, Palo Alto, CA 94301. Published in The Journal of Scientific Exploration, Vol, 11, No. 2, 1997 (jsasoc.com/docs/JSE-LST.pdf)

Abstract

Nothing is known about the physical mechanism of anomalous cognition (AC), or ESP. A first step towards generating focused hypotheses would be the discovery of a physical parameter which clearly modulated AC performance. In this paper, an association between the local sidereal time (LST) at which a trial occurs and the resulting effect size is described. In an existing database of 1,468 free response trials, the effect size increased 340% for trials within 1 hour of 13.5 h LST (p = 0.001). A independent database of 1,015 similar trials was subsequently obtained in which trials within 1 hour of 13.5 h LST showed an effect size increase of 450% (p = 0.05) providing confirmation of the effect. Possible artifacts due to the non-uniform distribution of trials in clock time and variations of effect size with experiment are discussed and rejected as explanations. Assuming that some unknown systematic bias is not present in the data, it appears that AC performance is strongly dependent upon the LST at which the trial occurs. This is evidence of a causal connection between performance and the orientation of the receiver (i.e., a term for subject or participant), the earth and the fixed stars.

This article described what may be an important discovery about nonphysical phenomena, especially as it relates to transcommunication. In the study, Spottiswoode examined the rather large collection of psychic ability experiments he had conducted over the years to see if they pointed to a relationship between sidereal time and the psychic proficiency of his subjects.  There was a direct relationship!  He then asked colleagues to conduct a new set of experiments to confirm his conclusions.  The results, and therefore the phenomena, were verified.

Sidereal time is star time and a sidereal day is approximately 3 minutes, 56 seconds shorter than a solar day.  Thus, Local Sidereal Time (LST) moves backward in solar time about four minutes a day, two hours a month and one day a year. Anywhere you are on the planet, at the same LST you will see the same stars overhead as anyone anywhere else will at that time.

The essence of the article we are referring to is that scientists have found a direct correlation between the sidereal time of day and success in psychic ability experiments.  The graph shown on this page is from Spottiswoode’s article and depicts “Effect Size” on the vertical axis and “Local Sidereal Time” on the horizontal axis.  “Effect Size” is the amount of deviation more or less than the expected normal for chance.  The horizontal line between 0.1 and 0.2 represents the average of the graph curve.  The line at 0.0 represents what would be expected with guessing.  We have added a vertical, dotted line at 13.5 hours and near 19.0 hours.

To quote the report, “Evidence has been given to support a relationship between the local sidereal time at which an anomalous cognition experiment occurs and the resulting effect size.  The primary association is an approximately four-fold enhancement in AC effect size at 13.5 h LST.  [Anomalous Cognition (AC)” seems to be a new term for Extra Sensory Perception (ESP)—Editor]  This association was found in one large data set and confirmed in another, each set comprising AC experiments with a range of free response protocols, from different laboratories and investigators.  It is likely that the increase of effect size for AC trials occurring at 13.5 h LST is real, replicable across different laboratories and occurs in the diverse protocols of the ganzfeld and remote viewing experiments.”

Psi functioning seems to be a real human ability, but while it is often reported anecdotally, there has been considerable difficulty proving under controlled conditions. It may be that this difficulty has been due to the fact that researchers have been conducting experiments at different sidereal times of day.  Almost a six-fold difference in performance of a psychic between 13.5 h and 18.9 h LST is substantial.  And remember, 13.5 hours LST changes in solar time each day.

The evidence suggests that there is something near or beyond the edge of the Solar System that is influencing our psychic ability.  Of course, experiments will need to be conducted to see if this influence affects EVP collection in the same way as psychic ability.  But, we have good reason to believe that there is a mediumistic relationship in EVP between the experimenter and the communicating entity.  And of course, mediumship is psychic ability turned toward spirit communications.

Besides explaining why psychic phenomena is so hard to prove, the reason the discovery of this relationship may be important to the study of transcommunication is that it points to an external influence on psychic ability.  It should be just a matter of time before someone figures out what that influence is and what in the human brain it is influencing.  Once that has been accomplished, it should be possible to enhance psychic ability with technology.

Source, Apparent Association between Effect Size in Free Response Anomalous Cognition Experiments and Local Sidereal Time, by S. James P. Spottiswoode, published in the Journal of Scientific Exploration, Vol. II, No. 2, 1997.  You can find it at jsasoc.com.

Using a Phone Line for EVP Collection

telcosim

Also see: Recording EVP Using a Telephone and EVP Using VoIP and Telephones

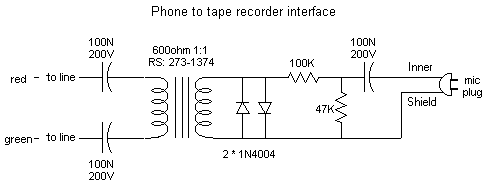
The above device permits the connection of a household phone (and phone line) to a tape recorder or computer soundcard for EVP voice recording purposes.
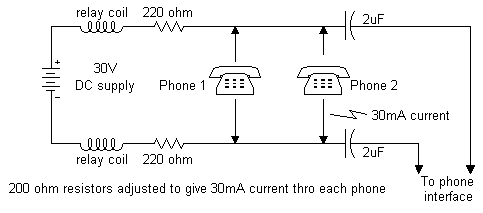
The device input taps directly onto the (undisturbed) phone connection wiring, with the output having a microphone (or sound card) audio plug via shielded cable.

When used in this way, the telephones are used as a modified form of tape recorder microphone for receiving EVP voices as per the standard microphone method. The procedure that has been mentioned previously in the AA-EVP newsletter may be useful – that is, letting the phone go “dead” after picking up the handset – then recording. A faint background sound source may be useful with this microphone method – perhaps a local radio tuned to static / low level voice babble.

If there are two phones on the same line, both may be used simultaneously (see later comments).

When used, the phone network supplies power to energize the telephones when the handset is lifted, and the device then channels the audio to the recorder or sound card.

Older models of telephone may work better with this method, one reason being due to them having the older carbon microphone, rather than the more modern electric version.

Circuit Details

The two 100N caps connected to the line are to isolate the phone line DC from the transformer, preventing any call set-up requests to the phone exchange when the device is connected (phone exchange will not sense this device). Device connects to red and green wires (in USA) of phone termination. Do not remove any existing wires at termination.

The transformer provides balanced input to unbalanced output, so the microphone plug can be grounded via the recorder without upsetting phone line balance.

The 100K / 4K7 resistors drop the line audio level so to be compatible with normal microphone input sensitivities.

The two cross connected diodes ensure that any ringing voltages do not damage the tape recorder (if the phone rings while this device is connected the tape recorder will not be damaged).

Construction

A metal enclosure would be preferable to avoid hum pick-up.

Shielded cable should be used between microphone plug and the box and its components. The metal case (if used) should be connected to the cable shield ground.


Simulated Local Telephone Network

(not connected to phone company)

telcosimA couple of stand-alone telephones can be energized locally to form a simulated network (see above diagram) for experimentation. The output shown, connects to the phone interface.

A 30V (approximately) supply is used to energize the phone, and this voltage is fed to the phone via two sets of relay coils and resistors. The coils ensure that derived audio is not attenuated by the power supply, and the resistors set the standing current flowing through the phones. This current should be set to 30mA per phone. If preferable, the power supply voltage can be altered instead, to achieve the 30mA.

The use of two telephones may provide advantage over a single unit for the purposes of EVP reception, as there is a circulating interaction of simultaneous audio currents between the two units, which may aid reception.

The two 2uF capacitors may not be needed if the above device only connects to the interface unit – as the interface already has DC input blocking.