Also see Butler ITC Gallery 2, Butler ITC Gallery 2, Butler ITC Gallery 3,
and Perception of Visual ITC Images
A Brief Discussion of the Pictures
The ITC images described by Lisa in Butler ITC Gallery 1 provides an interesting study in ITC photography. The initial video was taken with a Cannon 8mm ES2000 analog camcorder set about three feet from a Sony KV20TS32, 20-inch Trinitron color TV. The camera was focused just beyond the screen surface and the composite video out of the camera was connected to the video input of the TV so that the camera was “seeing” its output in a video loop. The camera was zoomed so that about five inches of the screen was revealed to the camera.
An example of the video loop is shown above. It is a highly compressed file and the phenomenal features normally seen in the higher resolution NTSC format are not as clear. Even so, move the track market to 01, 06 and 08 seconds and look for phenomenal features. An analog camera and monitor has been most effective for us. We adjust the camera for a balance between very sharp-pixilated display and a too-soft display. Experiment to find that balance. Look for the features in the medium bright areas.
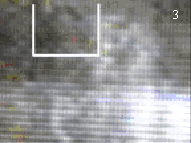
The resulting video clip was loaded into a computer and Pinnacle Systems Studio DC10 Plus was used for review. The video was examined frame by frame and interesting frames were captured as individual pictures. Figure 1 is an example of these “grabbed” video frames. Because we were focused on an area of the screen that had a lot of optical texture, the resulting frames tended to be dark. The screen was also flashing from light to dark. While this seems to have given us ITC, it has also frustrated our attempts to display the images with our method of printing this newsletter.
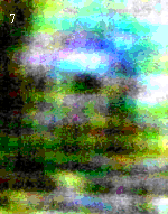
We sent two of the more interesting frames to member, Erland Babcock, who edited them to produce Figure 2. Erland uses editing software that came with his Toshiba PDR-M70 digital camera and it is more effective than any of the editors we use. Lisa had seen other possibilities in Figure 1, but I was focused on what looks like a full-bust image of a man in the middle of the frame. If you look at the upper left quadrant of Figure 1, you can see that I have highlighted what looks like a hat. Figure 2 is that region enlarged and enhanced. With this image, and other renditions not shown, you can see a man wearing a hat. It looks like he has a full beard. There is evidence of blue sky above him and shrubbery at his right. His shoulders may also be visible.
It is important to note that the resolution of the original frame should not support the fine shading of the shape of the hat. In other words, I believe that the ITC image has higher resolution than the original frame. Also, if this were an illusion, we would expect to more often see other familiar objects. Erland has pointed out to us that he has captured pastoral scenes and what looks like aerial views of land and water. But we are mostly collecting faces, which raises the question again, why faces, why whole faces and who are they?
We have included an image showing a full head of a person in Figure 3. The original frame was almost completely black, so what is shown here is an enhancement. It is hard to tell, but the person looks a lot like an extraterrestrial standing in front of a round window.
  |
 |
 |
| Figure 1
A full video frame |
Figure 2
This picture was cropped from the frame in Figure 1 from the area marked with a white box. The intensity and contrast has been changed in a photo editor to make the feature more visible. No color has been added. |
Figure 3
A feature that has been cropped from a different video frame that was almost black before the intensity was changed in a photo editor. |
 |
 |
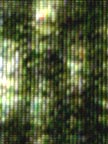
| Figure 4
Typical texture in video frame when the camera is three to five inches from the television screen. Notice that you can see the texture of the pixels. All of the examples in Butler Gallery 1 and 2 in the Examples pages were collected with the camera very close to the screen. You will notice that the pixels tend to dominate the features. (Please note that the framer has been rotated 90 degrees. |
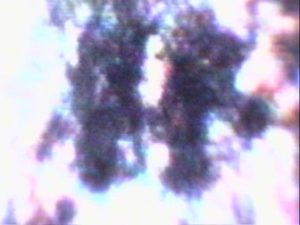
Figure 5
Typical texture in video frame when the camera about three feet from the television screen. Notice that you do not see the texture of the pixels. All of the examples in Butler Gallery 3 in the Examples pages were collected with the camera three feet from the screen. You will notice that the features tend to be softer in texture. |
Steps in Recording Video-Loop ITC
We use what is known as the Schreiber method for Video ITC. The technique of connecting the output of a video camera to the input of a television set, and then taping the video noise that can be seen on the television screen, was apparently first developed for Schreiber by Martin Wenzel.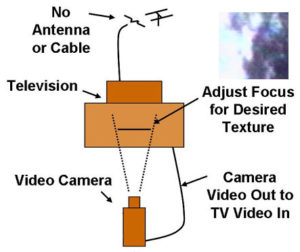
- Preparing the Video Loop: Position the camera about three feet in front of the television screen. Connect the Video-Out of the Camera to Video-In of the television and select Video-In on the television set. Aim the camera at the television set and slowly adjust the focus, and zoom until the dark to light flashing is visible on the television screen, with cloudy or foggy texture in various colors during the bright flashes. The focus should be six to twelve inches past the surface of the screen when the equipment is ready to record. The most important objective is to see swirling clouds.
- Preparing Yourself: Follow the same preparatory process you use for EVP sessions. Remember that there are nonphysical entities who are present and able to “witness” your activity. Consider using the same music each time as a “signature” or “signpost,” indicating that preparation for a session is underway. Also consider conducting a short meditation or prayer.
After meditation, we change from music to the background sound that we use for EVP. The background sound of white noise is used because we always listen to the video sound track. Also, an IC recorder is usually recording during the sessions. This, of course, is optional. Speaking out loud, we talk to our team about the last session and discuss the various successes or failures of that experiment. Asking for their assistance in bringing the images through, we announce that we are going to begin the experiment. This is all done just as if they were standing in the room with us. Each session brings different discussions and questions. Ask for information on how to improve the experiments, and for specific people to show themselves in the video.
The experimenter is part of the circuit and we feel that meditation and/or prayer helps bring the experimenter into a more balanced state. This helps to focus the experimenter’s intention and better helps those on the other side create a link to the experimenter.
- Conducting the Experiment: Speaking out loud, tell the entities that you are about to begin recording. State what you wish to see in your video frames, and perhaps, offer feedback about the previous experiment. Turn on the equipment and wait a few seconds for the feedback loop to stabilize. Record for about thirty seconds. You may record longer, but remember that the camera will record around twenty-nine frames a second, and that thirty seconds represents a large number of frames. Turn off the video camera and verbally thank the entities for their help.
- Analysis of Video: Transfer the video onto a computer. You can alternatively include the computer in the recording circuit during the experiment and record the video with the computer rather than with the camera. Once in the computer, examine each frame of the video and “grab” frames that have optical texture, such as blotches of color. Examine each grabbed frame in a photo editor as if it were a photograph. Use magnification, intensity changes and rotations while looking for features.
We highly recommend that you read the section about Video ITC in the book, There is no Death and There are No Dead.
![]()
